(function() {
document.addEventListener('DOMContentLoaded', function() {
var componentMetadata = JSON.parse('\x7b\x22componentName\x22\x3a\x22ActionToolbar_df074d3f-5da0-436a-967c-b8982c9bac0f\x22,\x22deferOptions\x22\x3a\x7b\x22deferComponent\x22\x3afalse,\x22deferType\x22\x3a\x22None\x22,\x22deferId\x22\x3a\x22r7cabdf7a1d63427a9481e27d42ead1fb\x22,\x22deferredContainerId\x22\x3a\x22\x2fmain\x2fdockingActionToolbar\x22,\x22deferredContainerView\x22\x3anull\x7d,\x22viewName\x22\x3a\x22ActionToolbar\x22\x7d');
var configuration = {"contentId":"8b3daad2-44b5-4032-a9ec-15f7790e6330","toolbarSettings":{"id":"df074d3f-5da0-436a-967c-b8982c9bac0f","registrationUrl":"/GMI/CoreSites/LMD/Home/register/reg-fp","regAction":"FAVORITE","eSourceCode":11275,"namePassedToEvents":"RDPToolbarSTICKY","buttons":[{"addFavoriteErrorMessage":"Sorry, something went wrong. Please save again.","removeFavoriteErrorMessage":"Error occurred while removing from favorites","registrationUrl":"/GMI/CoreSites/LMD/Home/register/reg-fp","regAction":"FAVORITE","eSourceCode":11275,"isCurrentUserAnonymous":false,"isFavoriteItem":false,"id":"6f6aac70-ffa0-4e45-8966-75724e41c552","allowedForAnonymousUsers":false,"type":"Favorite","displayName":"Save","toggleDisplayName":"Saved","namePassedToEvents":"Favorite","cssClassName":"atButtonFavorite","privacyOptOutMessage":"\u003cdiv class=\u0027privacyMessage\u0027\u003e\n\u003ch3\u003eThis feature is not available with your current cookie settings.\u003c/h3\u003e\n\u003cp\u003eYou can \u003ca href=\u0027#\u0027 data-show-preference-center=\u00271\u0027\u003eupdate your privacy settings\u003c/a\u003e to enable this content. Please enable “Functional Cookies” to use this feature.\u003c/p\u003e\n\u003c/div\u003e","showPrivacyOptOutMessage":false},{"nestedButtons":[{"layoutParameter":"p%3d1","id":"bd26014a-b182-4ef2-a496-f791f5fd3db9","allowedForAnonymousUsers":true,"type":"Print","displayName":"Print Recipe","toggleDisplayName":"","namePassedToEvents":"Print","cssClassName":"atButtonPrint","privacyOptOutMessage":"\u003cdiv class=\u0027privacyMessage\u0027\u003e\n\u003ch3\u003eThis feature is not available with your current cookie settings.\u003c/h3\u003e\n\u003cp\u003eYou can \u003ca href=\u0027#\u0027 data-show-preference-center=\u00271\u0027\u003eupdate your privacy settings\u003c/a\u003e to enable this content. Please enable “Functional Cookies” to use this feature.\u003c/p\u003e\n\u003c/div\u003e","showPrivacyOptOutMessage":false},{"providerName":"pinterest","providerNamePassedToEvents":"Pinterest","shareUrlFormat":"//pinterest.com/pin/create/link/?url={0}","id":"fd510c44-38cc-4ce2-8f39-fcdae5bba458","allowedForAnonymousUsers":true,"type":"Social","displayName":"Save To Pinterest","toggleDisplayName":"","namePassedToEvents":"Pinterest","cssClassName":"atButtonPinterest","privacyOptOutMessage":"\u003cdiv class=\u0027privacyMessage\u0027\u003e\n\u003ch3\u003eThis feature is not available with your current cookie settings.\u003c/h3\u003e\n\u003cp\u003eYou can \u003ca href=\u0027#\u0027 data-show-preference-center=\u00271\u0027\u003eupdate your privacy settings\u003c/a\u003e to enable this content. Please enable “Functional Cookies” to use this feature.\u003c/p\u003e\n\u003c/div\u003e","showPrivacyOptOutMessage":false},{"templateId":"9ad0c975-3420-4a6f-b051-5451375d6cf3","dialogHeading":"Email Recipe","emailCode":"LMD_ContentEmailEN","dialogSettings":{"cancelButtonText":"Cancel","copyToSenderLabel":"Send a Copy to Myself","emailAddressesLabel":"* Email Address(es)","emailInstructionText":"Separate email addresses with commas","fromText":"From:","privacyPolicyText":"\u003cp\u003e\u0026copy;2025 General Mills, Inc. All Rights Reserved. This information will only be used to send an email to your friend(s) and will not be saved. Please read our \u003ca rel=\u0022noopener noreferrer\u0022 rel=\u0022noopener noreferrer\u0022 href=\u0022https://www.lifemadedelicious.ca/Home/privacy-policy\u0022 target=\u0022_blank\u0022 shape=\u0022rect\u0022\u003ePrivacy Policy\u003c/a\u003e.\u003c/p\u003e","requiredFieldText":"* Required","sendButtonText":"Send","senderEmailAddressLabel":"* Your Email Address","senderFirstNameLabel":"* Your First Name","sendToText":"Send To:"},"id":"f0779e23-0418-4648-ab4e-6c9c795fafa4","allowedForAnonymousUsers":true,"type":"Email","displayName":"Share via Email","toggleDisplayName":"","namePassedToEvents":"Email","cssClassName":"atButtonEmail","privacyOptOutMessage":"\u003cdiv class=\u0027privacyMessage\u0027\u003e\n\u003ch3\u003eThis feature is not available with your current cookie settings.\u003c/h3\u003e\n\u003cp\u003eYou can \u003ca href=\u0027#\u0027 data-show-preference-center=\u00271\u0027\u003eupdate your privacy settings\u003c/a\u003e to enable this content. Please enable “Functional Cookies” to use this feature.\u003c/p\u003e\n\u003c/div\u003e","showPrivacyOptOutMessage":false},{"providerName":"facebook","providerNamePassedToEvents":"Facebook","shareUrlFormat":"//facebook.com/sharer/sharer.php?u={0}","id":"d17d1726-3e67-4b4e-92e4-664f5602c3a1","allowedForAnonymousUsers":true,"type":"Social","displayName":"Share on Facebook","toggleDisplayName":"","namePassedToEvents":"Facebook","cssClassName":"atButtonFacebook","privacyOptOutMessage":"\u003cdiv class=\u0027privacyMessage\u0027\u003e\n\u003ch3\u003eThis feature is not available with your current cookie settings.\u003c/h3\u003e\n\u003cp\u003eYou can \u003ca href=\u0027#\u0027 data-show-preference-center=\u00271\u0027\u003eupdate your privacy settings\u003c/a\u003e to enable this content. Please enable “Functional Cookies” to use this feature.\u003c/p\u003e\n\u003c/div\u003e","showPrivacyOptOutMessage":false},{"successMessage":"Copied.","errorMessage":"Press Ctrl+C and Enter to copy to clipboard","successMessageDuration":3000,"errorMessageDuration":10000,"id":"88277bbd-dc03-4061-b48e-d17adef2befb","allowedForAnonymousUsers":true,"type":"CopyLink","displayName":"Copy Link","toggleDisplayName":"","namePassedToEvents":"Copy","cssClassName":"atButtonCopyLink","privacyOptOutMessage":"\u003cdiv class=\u0027privacyMessage\u0027\u003e\n\u003ch3\u003eThis feature is not available with your current cookie settings.\u003c/h3\u003e\n\u003cp\u003eYou can \u003ca href=\u0027#\u0027 data-show-preference-center=\u00271\u0027\u003eupdate your privacy settings\u003c/a\u003e to enable this content. Please enable “Functional Cookies” to use this feature.\u003c/p\u003e\n\u003c/div\u003e","showPrivacyOptOutMessage":false}],"id":"34b02711-f190-48a8-bbf5-6c40991c0b31","allowedForAnonymousUsers":true,"type":"Reveal","displayName":"Share","toggleDisplayName":"","namePassedToEvents":"Share","cssClassName":"atButtonReveal","privacyOptOutMessage":"\u003cdiv class=\u0027privacyMessage\u0027\u003e\n\u003ch3\u003eThis feature is not available with your current cookie settings.\u003c/h3\u003e\n\u003cp\u003eYou can \u003ca href=\u0027#\u0027 data-show-preference-center=\u00271\u0027\u003eupdate your privacy settings\u003c/a\u003e to enable this content. Please enable “Functional Cookies” to use this feature.\u003c/p\u003e\n\u003c/div\u003e","showPrivacyOptOutMessage":false},{"errorMessage":"","id":"76dcbea3-f5dd-4c94-afab-8fb88a715404","allowedForAnonymousUsers":true,"type":"WakeLock","displayName":"Keep Screen On","toggleDisplayName":"","namePassedToEvents":"Wakelock","cssClassName":"","privacyOptOutMessage":"\u003cdiv class=\u0027privacyMessage\u0027\u003e\n\u003ch3\u003eThis feature is not available with your current cookie settings.\u003c/h3\u003e\n\u003cp\u003eYou can \u003ca href=\u0027#\u0027 data-show-preference-center=\u00271\u0027\u003eupdate your privacy settings\u003c/a\u003e to enable this content. Please enable “Functional Cookies” to use this feature.\u003c/p\u003e\n\u003c/div\u003e","showPrivacyOptOutMessage":false}],"isSticky":true},"userSettings":{"isCurrentUserAnonymous":true,"isFavoriteItem":false,"isAnonymousUserWithFavorites":false},"pageAttributes":{"url":"https%3a%2f%2fwww.lifemadedelicious.ca%2frecipes%2fapple-pear-and-cranberry-pie%2f8b3daad2-44b5-4032-a9ec-15f7790e6330","contentId":"8b3daad2-44b5-4032-a9ec-15f7790e6330"},"recaptchaPublicKey":"6LfV_icUAAAAAJakoUTv-L6S9c3T3X64J3Ba9cZS"};
var moduleName = 'actionToolbar';
var isVueModule = true;
GeneralMills.PandoSites.RegisterControlInstance(moduleName, configuration, componentMetadata, isVueModule)
});
})();
(function() {
document.addEventListener('DOMContentLoaded', function() {
var componentMetadata = JSON.parse('\x7b\x22componentName\x22\x3a\x22ActionToolbar_df074d3f-5da0-436a-967c-b8982c9bac0f\x22,\x22deferOptions\x22\x3a\x7b\x22deferComponent\x22\x3afalse,\x22deferType\x22\x3a\x22None\x22,\x22deferId\x22\x3a\x22r1620b676c6df4f6181c935ce0877b844\x22,\x22deferredContainerId\x22\x3a\x22\x2fmain\x2fdockingActionToolbarMobile\x22,\x22deferredContainerView\x22\x3anull\x7d,\x22viewName\x22\x3a\x22ActionToolbar\x22\x7d');
var configuration = {"contentId":"8b3daad2-44b5-4032-a9ec-15f7790e6330","toolbarSettings":{"id":"df074d3f-5da0-436a-967c-b8982c9bac0f","registrationUrl":"/GMI/CoreSites/LMD/Home/register/reg-fp","regAction":"FAVORITE","eSourceCode":11275,"namePassedToEvents":"RDPToolbarSTICKY","buttons":[{"addFavoriteErrorMessage":"Sorry, something went wrong. Please save again.","removeFavoriteErrorMessage":"Error occurred while removing from favorites","registrationUrl":"/GMI/CoreSites/LMD/Home/register/reg-fp","regAction":"FAVORITE","eSourceCode":11275,"isCurrentUserAnonymous":false,"isFavoriteItem":false,"id":"6f6aac70-ffa0-4e45-8966-75724e41c552","allowedForAnonymousUsers":false,"type":"Favorite","displayName":"Save","toggleDisplayName":"Saved","namePassedToEvents":"Favorite","cssClassName":"atButtonFavorite","privacyOptOutMessage":"\u003cdiv class=\u0027privacyMessage\u0027\u003e\n\u003ch3\u003eThis feature is not available with your current cookie settings.\u003c/h3\u003e\n\u003cp\u003eYou can \u003ca href=\u0027#\u0027 data-show-preference-center=\u00271\u0027\u003eupdate your privacy settings\u003c/a\u003e to enable this content. Please enable “Functional Cookies” to use this feature.\u003c/p\u003e\n\u003c/div\u003e","showPrivacyOptOutMessage":false},{"nestedButtons":[{"layoutParameter":"p%3d1","id":"bd26014a-b182-4ef2-a496-f791f5fd3db9","allowedForAnonymousUsers":true,"type":"Print","displayName":"Print Recipe","toggleDisplayName":"","namePassedToEvents":"Print","cssClassName":"atButtonPrint","privacyOptOutMessage":"\u003cdiv class=\u0027privacyMessage\u0027\u003e\n\u003ch3\u003eThis feature is not available with your current cookie settings.\u003c/h3\u003e\n\u003cp\u003eYou can \u003ca href=\u0027#\u0027 data-show-preference-center=\u00271\u0027\u003eupdate your privacy settings\u003c/a\u003e to enable this content. Please enable “Functional Cookies” to use this feature.\u003c/p\u003e\n\u003c/div\u003e","showPrivacyOptOutMessage":false},{"providerName":"pinterest","providerNamePassedToEvents":"Pinterest","shareUrlFormat":"//pinterest.com/pin/create/link/?url={0}","id":"fd510c44-38cc-4ce2-8f39-fcdae5bba458","allowedForAnonymousUsers":true,"type":"Social","displayName":"Save To Pinterest","toggleDisplayName":"","namePassedToEvents":"Pinterest","cssClassName":"atButtonPinterest","privacyOptOutMessage":"\u003cdiv class=\u0027privacyMessage\u0027\u003e\n\u003ch3\u003eThis feature is not available with your current cookie settings.\u003c/h3\u003e\n\u003cp\u003eYou can \u003ca href=\u0027#\u0027 data-show-preference-center=\u00271\u0027\u003eupdate your privacy settings\u003c/a\u003e to enable this content. Please enable “Functional Cookies” to use this feature.\u003c/p\u003e\n\u003c/div\u003e","showPrivacyOptOutMessage":false},{"templateId":"9ad0c975-3420-4a6f-b051-5451375d6cf3","dialogHeading":"Email Recipe","emailCode":"LMD_ContentEmailEN","dialogSettings":{"cancelButtonText":"Cancel","copyToSenderLabel":"Send a Copy to Myself","emailAddressesLabel":"* Email Address(es)","emailInstructionText":"Separate email addresses with commas","fromText":"From:","privacyPolicyText":"\u003cp\u003e\u0026copy;2025 General Mills, Inc. All Rights Reserved. This information will only be used to send an email to your friend(s) and will not be saved. Please read our \u003ca rel=\u0022noopener noreferrer\u0022 rel=\u0022noopener noreferrer\u0022 href=\u0022https://www.lifemadedelicious.ca/Home/privacy-policy\u0022 target=\u0022_blank\u0022 shape=\u0022rect\u0022\u003ePrivacy Policy\u003c/a\u003e.\u003c/p\u003e","requiredFieldText":"* Required","sendButtonText":"Send","senderEmailAddressLabel":"* Your Email Address","senderFirstNameLabel":"* Your First Name","sendToText":"Send To:"},"id":"f0779e23-0418-4648-ab4e-6c9c795fafa4","allowedForAnonymousUsers":true,"type":"Email","displayName":"Share via Email","toggleDisplayName":"","namePassedToEvents":"Email","cssClassName":"atButtonEmail","privacyOptOutMessage":"\u003cdiv class=\u0027privacyMessage\u0027\u003e\n\u003ch3\u003eThis feature is not available with your current cookie settings.\u003c/h3\u003e\n\u003cp\u003eYou can \u003ca href=\u0027#\u0027 data-show-preference-center=\u00271\u0027\u003eupdate your privacy settings\u003c/a\u003e to enable this content. Please enable “Functional Cookies” to use this feature.\u003c/p\u003e\n\u003c/div\u003e","showPrivacyOptOutMessage":false},{"providerName":"facebook","providerNamePassedToEvents":"Facebook","shareUrlFormat":"//facebook.com/sharer/sharer.php?u={0}","id":"d17d1726-3e67-4b4e-92e4-664f5602c3a1","allowedForAnonymousUsers":true,"type":"Social","displayName":"Share on Facebook","toggleDisplayName":"","namePassedToEvents":"Facebook","cssClassName":"atButtonFacebook","privacyOptOutMessage":"\u003cdiv class=\u0027privacyMessage\u0027\u003e\n\u003ch3\u003eThis feature is not available with your current cookie settings.\u003c/h3\u003e\n\u003cp\u003eYou can \u003ca href=\u0027#\u0027 data-show-preference-center=\u00271\u0027\u003eupdate your privacy settings\u003c/a\u003e to enable this content. Please enable “Functional Cookies” to use this feature.\u003c/p\u003e\n\u003c/div\u003e","showPrivacyOptOutMessage":false},{"successMessage":"Copied.","errorMessage":"Press Ctrl+C and Enter to copy to clipboard","successMessageDuration":3000,"errorMessageDuration":10000,"id":"88277bbd-dc03-4061-b48e-d17adef2befb","allowedForAnonymousUsers":true,"type":"CopyLink","displayName":"Copy Link","toggleDisplayName":"","namePassedToEvents":"Copy","cssClassName":"atButtonCopyLink","privacyOptOutMessage":"\u003cdiv class=\u0027privacyMessage\u0027\u003e\n\u003ch3\u003eThis feature is not available with your current cookie settings.\u003c/h3\u003e\n\u003cp\u003eYou can \u003ca href=\u0027#\u0027 data-show-preference-center=\u00271\u0027\u003eupdate your privacy settings\u003c/a\u003e to enable this content. Please enable “Functional Cookies” to use this feature.\u003c/p\u003e\n\u003c/div\u003e","showPrivacyOptOutMessage":false}],"id":"34b02711-f190-48a8-bbf5-6c40991c0b31","allowedForAnonymousUsers":true,"type":"Reveal","displayName":"Share","toggleDisplayName":"","namePassedToEvents":"Share","cssClassName":"atButtonReveal","privacyOptOutMessage":"\u003cdiv class=\u0027privacyMessage\u0027\u003e\n\u003ch3\u003eThis feature is not available with your current cookie settings.\u003c/h3\u003e\n\u003cp\u003eYou can \u003ca href=\u0027#\u0027 data-show-preference-center=\u00271\u0027\u003eupdate your privacy settings\u003c/a\u003e to enable this content. Please enable “Functional Cookies” to use this feature.\u003c/p\u003e\n\u003c/div\u003e","showPrivacyOptOutMessage":false},{"errorMessage":"","id":"76dcbea3-f5dd-4c94-afab-8fb88a715404","allowedForAnonymousUsers":true,"type":"WakeLock","displayName":"Keep Screen On","toggleDisplayName":"","namePassedToEvents":"Wakelock","cssClassName":"","privacyOptOutMessage":"\u003cdiv class=\u0027privacyMessage\u0027\u003e\n\u003ch3\u003eThis feature is not available with your current cookie settings.\u003c/h3\u003e\n\u003cp\u003eYou can \u003ca href=\u0027#\u0027 data-show-preference-center=\u00271\u0027\u003eupdate your privacy settings\u003c/a\u003e to enable this content. Please enable “Functional Cookies” to use this feature.\u003c/p\u003e\n\u003c/div\u003e","showPrivacyOptOutMessage":false}],"isSticky":true},"userSettings":{"isCurrentUserAnonymous":true,"isFavoriteItem":false,"isAnonymousUserWithFavorites":false},"pageAttributes":{"url":"https%3a%2f%2fwww.lifemadedelicious.ca%2frecipes%2fapple-pear-and-cranberry-pie%2f8b3daad2-44b5-4032-a9ec-15f7790e6330","contentId":"8b3daad2-44b5-4032-a9ec-15f7790e6330"},"recaptchaPublicKey":"6LfV_icUAAAAAJakoUTv-L6S9c3T3X64J3Ba9cZS"};
var moduleName = 'actionToolbar';
var isVueModule = true;
GeneralMills.PandoSites.RegisterControlInstance(moduleName, configuration, componentMetadata, isVueModule)
});
})();
(function() {
document.addEventListener('DOMContentLoaded', function() {
var componentMetadata = JSON.parse('\x7b\x22componentName\x22\x3a\x22DoubleClick_ce9fed80-c574-4dca-af76-2ebf4e544811\x22,\x22deferOptions\x22\x3a\x7b\x22deferComponent\x22\x3atrue,\x22deferType\x22\x3a\x22OnDemand\x22,\x22deferId\x22\x3a\x22rf3f223b7bbff410488280e9a6b4b9694\x22,\x22deferredContainerId\x22\x3a\x22\x2fmain\x2frdpFeatureAdMobile\x22,\x22deferredContainerView\x22\x3a\x22DoubleClick\x22\x7d,\x22viewName\x22\x3a\x22DoubleClick\x22\x7d');
var configuration = {"adId":"m_lmd/recipes_300x250_top","minPageWidth":"299","maxPageWidth":"767","defaultMinPageWidth":"1000","defaultMaxPageWidth":"9999","size":"[[300,250], [300,600]]","refreshWhenViewed":false,"adContainerId":"2bf81848-cb6c-4cbd-bd8e-322045f536a6","doubleClickAdContainerId":"61f85da9-dc71-4ade-a701-27b56e62cf4c","adCaptionText":"Advertisement","networkCode":"/21727793496/","relevantMetadata":[],"privacyOptOut":true,"isThirdPartyProvider":false,"thirdPartyTag":"","sovrnCssClass":"","responsive":false,"contentType":"Recipe","itemId":"8b3daad2-44b5-4032-a9ec-15f7790e6330","continuesBelowText":"Recipe Continues Below"};
var moduleName = 'doubleClick';
var isVueModule = true;
GeneralMills.PandoSites.RegisterControlInstance(moduleName, configuration, componentMetadata, isVueModule)
});
})();
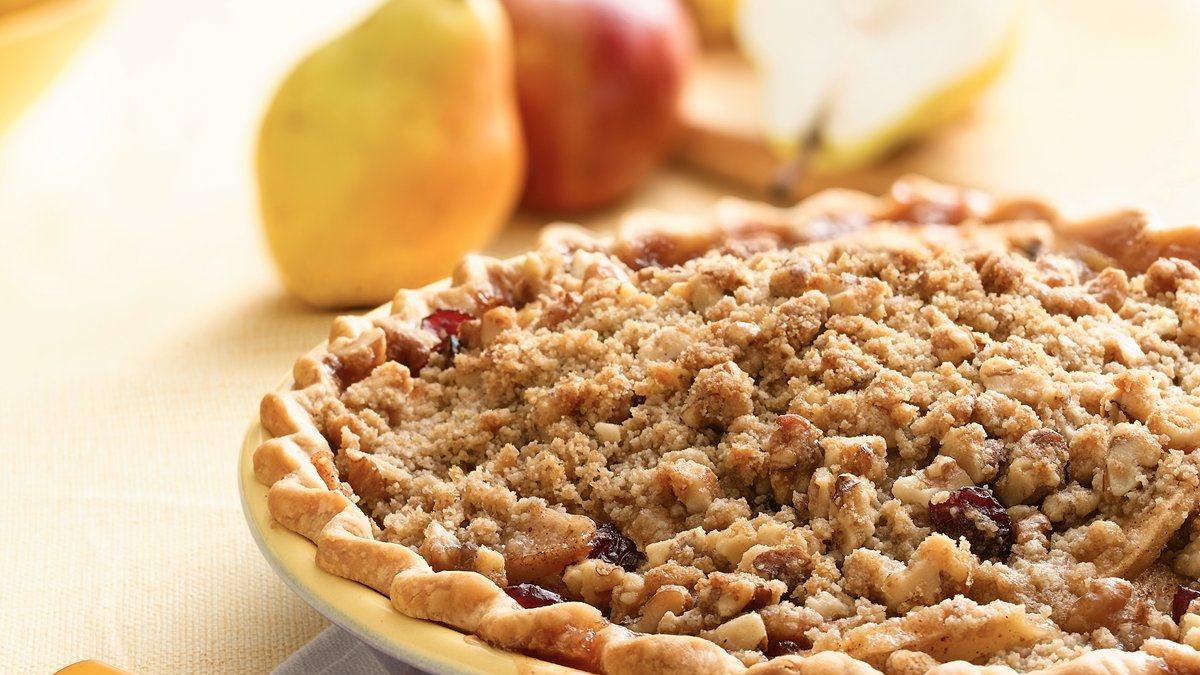
Ingredients
-
Crust
-
1/2 pkg Pillsbury* Refrigerated Pie Crusts, softened as directed on box (1 crust)
-
Filling
-
3/4 cup (175 mL) sugar
-
2 tbsp (25 mL) cornstarch
-
1 tsp (5 mL) ground cinnamon
-
1/2 tsp (2 mL) ground nutmeg
-
3 cups (750 mL) thinly sliced, peeled tart apples
-
3 cups (750 mL) thinly sliced, peeled ripe pears
-
1/2 cup (125 mL) sweetened dried cranberries
-
Topping
-
1/2 cup (125 mL) all-purpose flour
-
1/4 cup (50 mL) packed brown sugar
-
1/4 cup (50 mL) cold butter
-
1/2 cup (125 mL) coarsely chopped walnuts
(function() {
document.addEventListener('DOMContentLoaded', function() {
var componentMetadata = JSON.parse('\x7b\x22componentName\x22\x3a\x22RecipeIngredients_3cc1a3d7-6b3e-46c1-a356-e6a5352038ba\x22,\x22deferOptions\x22\x3a\x7b\x22deferComponent\x22\x3afalse,\x22deferType\x22\x3a\x22None\x22,\x22deferId\x22\x3a\x22r8021f9beafec4f8eabe566df6957748c\x22,\x22deferredContainerId\x22\x3a\x22\x2fmain\x2frdpIngredients\x22,\x22deferredContainerView\x22\x3anull\x7d,\x22viewName\x22\x3a\x22RecipeIngredients\x22\x7d');
var configuration = {};
var moduleName = 'recipeIngredients';
var isVueModule = false;
GeneralMills.PandoSites.RegisterControlInstance(moduleName, configuration, componentMetadata, isVueModule)
});
})();
-
Heat oven to 400ºF. Place pie crust in 9-inch glass pie plate as directed on box for One-Crust Filled Pie.
-
In large bowl, mix sugar, cornstarch, cinnamon and nutmeg. Gently stir in apples, pears and dried cranberries. Pour filling into crust-lined pie plate.
-
In small bowl, mix topping ingredients until crumbly; sprinkle over filling.
-
Line 15x10-inch pan with foil; place on oven rack below the rack pie will be baked on to catch any spillover. Loosely cover pie with sheet of foil; bake 1 hour. Uncover; bake 10 minutes longer or until apples are tender and topping is golden brown.
(function() {
document.addEventListener('DOMContentLoaded', function() {
var componentMetadata = JSON.parse('\x7b\x22componentName\x22\x3a\x22RecipeSteps_3cc1a3d7-6b3e-46c1-a356-e6a5352038ba\x22,\x22deferOptions\x22\x3a\x7b\x22deferComponent\x22\x3atrue,\x22deferType\x22\x3a\x22OnDemand\x22,\x22deferId\x22\x3a\x22r3046527427b8402db7985bd8ad63edaf\x22,\x22deferredContainerId\x22\x3a\x22\x2fmain\x2frdpSteps\x22,\x22deferredContainerView\x22\x3a\x22RecipeDetail\x22\x7d,\x22viewName\x22\x3a\x22RecipeSteps\x22\x7d');
var configuration = {"initAreImagesHidden":false,"hideImagesEventName":"HideStepShots","showImagesEventName":"ShowStepShots","hideImagesButtonText":"Hide Images","showImagesButtonText":"Show Images","hideImagesClass":"rdpHideStepImages"};
var moduleName = 'recipeStepShots';
var isVueModule = true;
GeneralMills.PandoSites.RegisterControlInstance(moduleName, configuration, componentMetadata, isVueModule)
});
})();
Expert Tips
-
Tip 1
Success: Ripe Anjou or Bosc pears work well for pies. Choose fruit that is fragrant and slightly soft to the touch.
-
Tip 2
Serve With: This pie is delicious served warm, with a scoop of vanilla bean ice cream, and drizzled with caramel sauce.
(function() {
document.addEventListener('DOMContentLoaded', function() {
var componentMetadata = JSON.parse('\x7b\x22componentName\x22\x3a\x22RecipeTipsNonPrint_3cc1a3d7-6b3e-46c1-a356-e6a5352038ba\x22,\x22deferOptions\x22\x3a\x7b\x22deferComponent\x22\x3atrue,\x22deferType\x22\x3a\x22Simple\x22,\x22deferId\x22\x3a\x22r043e2712c84f4579af5ad6a500fd7530\x22,\x22deferredContainerId\x22\x3a\x22\x2fmain\x2frdpTips\x22,\x22deferredContainerView\x22\x3a\x22RecipeDetail\x22\x7d,\x22viewName\x22\x3a\x22RecipeTipsNonPrint\x22\x7d');
var configuration = {};
var moduleName = 'expandableTextContainer';
var isVueModule = true;
GeneralMills.PandoSites.RegisterControlInstance(moduleName, configuration, componentMetadata, isVueModule)
});
})();
Nutrition Information
No nutrition information available for this recipe
(function() {
document.addEventListener('DOMContentLoaded', function() {
var componentMetadata = JSON.parse('\x7b\x22componentName\x22\x3a\x22RecipeNutritionNonPrint_3cc1a3d7-6b3e-46c1-a356-e6a5352038ba\x22,\x22deferOptions\x22\x3a\x7b\x22deferComponent\x22\x3atrue,\x22deferType\x22\x3a\x22Simple\x22,\x22deferId\x22\x3a\x22r66bc3c6268e94b96b5c6892b0dcb9b83\x22,\x22deferredContainerId\x22\x3a\x22\x2fmain\x2frdpNutrition\x22,\x22deferredContainerView\x22\x3a\x22RecipeDetail\x22\x7d,\x22viewName\x22\x3a\x22RecipeNutritionNonPrint\x22\x7d');
var configuration = {"initIsExpanded":false,"expandEventName":"NutritionExpand","collapseEventName":"NutritionCollapse"};
var moduleName = 'recipeNutrition';
var isVueModule = true;
GeneralMills.PandoSites.RegisterControlInstance(moduleName, configuration, componentMetadata, isVueModule)
});
})();
© 2025 ®/TM General Mills All Rights Reserved
(function() {
document.addEventListener('DOMContentLoaded', function() {
var componentMetadata = JSON.parse('\x7b\x22componentName\x22\x3a\x22DoubleClick_c45190e8-920f-4a83-95bf-0a6f56e897c6\x22,\x22deferOptions\x22\x3a\x7b\x22deferComponent\x22\x3atrue,\x22deferType\x22\x3a\x22OnDemand\x22,\x22deferId\x22\x3a\x22r8b308eb59cc642d3a1424f75afc4027a\x22,\x22deferredContainerId\x22\x3a\x22\x2fmain\x2frdpFeatureAd\x22,\x22deferredContainerView\x22\x3a\x22DoubleClick\x22\x7d,\x22viewName\x22\x3a\x22DoubleClick\x22\x7d');
var configuration = {"adId":"lmd/recipes_300x250_top","minPageWidth":"1000","maxPageWidth":"9999","defaultMinPageWidth":"1000","defaultMaxPageWidth":"9999","size":"[[300,250], [300,600]]","refreshWhenViewed":false,"adContainerId":"8ab2907e-a786-44cf-84c3-c1feda2f81c2","doubleClickAdContainerId":"10b8e347-ce01-4f40-a665-81f7ab384d86","adCaptionText":"Advertisement","networkCode":"/21727793496/","relevantMetadata":[],"privacyOptOut":true,"isThirdPartyProvider":false,"thirdPartyTag":"","sovrnCssClass":"","responsive":false,"contentType":"Recipe","itemId":"8b3daad2-44b5-4032-a9ec-15f7790e6330","continuesBelowText":"Recipe Continues Below"};
var moduleName = 'doubleClick';
var isVueModule = true;
GeneralMills.PandoSites.RegisterControlInstance(moduleName, configuration, componentMetadata, isVueModule)
});
})();
(function() {
document.addEventListener('DOMContentLoaded', function() {
var componentMetadata = JSON.parse('\x7b\x22componentName\x22\x3a\x22DoubleClick_ab86085e-efd3-4de4-a482-42feac8cc09d\x22,\x22deferOptions\x22\x3a\x7b\x22deferComponent\x22\x3atrue,\x22deferType\x22\x3a\x22OnDemand\x22,\x22deferId\x22\x3a\x22r6e74121c9aa24923b46a55806b835478\x22,\x22deferredContainerId\x22\x3a\x22\x2fmain\x2frdpFeatureAd\x22,\x22deferredContainerView\x22\x3a\x22DoubleClick\x22\x7d,\x22viewName\x22\x3a\x22DoubleClick\x22\x7d');
var configuration = {"adId":"lmd/recipes_728x90_top","minPageWidth":"768","maxPageWidth":"999","defaultMinPageWidth":"1000","defaultMaxPageWidth":"9999","size":"[[728, 90], [970, 90]]","refreshWhenViewed":false,"adContainerId":"124fc625-88d1-4ba7-93d8-64cc30ef1dc9","doubleClickAdContainerId":"c71edaa6-9c64-4be5-abd2-85dea48c8d2b","adCaptionText":"Advertisement","networkCode":"/21727793496/","relevantMetadata":[],"privacyOptOut":true,"isThirdPartyProvider":false,"thirdPartyTag":"","sovrnCssClass":"","responsive":false,"contentType":"Recipe","itemId":"8b3daad2-44b5-4032-a9ec-15f7790e6330","continuesBelowText":"Recipe Continues Below"};
var moduleName = 'doubleClick';
var isVueModule = true;
GeneralMills.PandoSites.RegisterControlInstance(moduleName, configuration, componentMetadata, isVueModule)
});
})();
(function() {
document.addEventListener('DOMContentLoaded', function() {
var componentMetadata = JSON.parse('\x7b\x22componentName\x22\x3a\x22RelatedContent_18a51953-a085-4bea-b02d-cd3e6509e4fc\x22,\x22deferOptions\x22\x3a\x7b\x22deferComponent\x22\x3atrue,\x22deferType\x22\x3a\x22OnDemand\x22,\x22deferId\x22\x3a\x22r53f8b8fc830e4976aaa945d5e4ec19ac\x22,\x22deferredContainerId\x22\x3a\x22\x2fmain\x2frdpRelatedContent1\x22,\x22deferredContainerView\x22\x3a\x22RecipeDetail\x22\x7d,\x22viewName\x22\x3a\x22RelatedContent\x22\x7d');
var configuration = {"dataSourceId":"18a51953-a085-4bea-b02d-cd3e6509e4fc","isCurrentUserAnonymous":true,"isAnonymousUserWithFavorites":false,"relatedContentList":{"contentId":"8b3daad2-44b5-4032-a9ec-15f7790e6330","listSettings":{"pageSize":6,"startPage":1,"listType":1,"title":"Try These Next","useModalRegistration":false,"regAction":"","esrcCode":0,"favoriteButtonLabelFormat":"Add {0} to favorites","contentTypes":[],"showImages":true,"imageSize":0,"showRatings":false,"allowFavoriting":true,"cssClassName":"","favoriteButtonText":""},"items":[{"contentId":"9075a408-5140-491d-9db2-f3a1c8ae3170","contentType":"Recipe","title":"Pear and Cranberry Pie","isFavorite":false,"linkUrl":"/recipes/pear-and-cranberry-pie/9075a408-5140-491d-9db2-f3a1c8ae3170","numberOfRatings":"0","averageRating":"0","averageRatingStars":"0","smallImageUrl":"https://rms-media-prod.generalmills.com/756c2c41-fcd2-4d0b-ba57-a2d7aefbadc3.jpg","mediumImageUrl":"https://rms-media-prod.generalmills.com/3d9fa860-f257-4be1-89d0-bb8bf1e385f3.jpg"},{"contentId":"51fa1399-115d-42ac-93a1-c539dd6ef74f","contentType":"Recipe","title":"Streusel-Topped Cranberry-Pear Tart","isFavorite":false,"linkUrl":"/recipes/streusel-topped-cranberry-pear-tart/51fa1399-115d-42ac-93a1-c539dd6ef74f","numberOfRatings":"0","averageRating":"0","averageRatingStars":"0","smallImageUrl":"https://rms-media-prod.generalmills.com/48bb2eeb-d164-45bf-97ed-9d0068e10d35.jpg","mediumImageUrl":"https://rms-media-prod.generalmills.com/11ef8e70-584e-4e9b-a238-e83176164329.jpg"},{"contentId":"09c14b7a-b4ce-4d89-a985-0f3253f1cbde","contentType":"Recipe","title":"Apple-Pear Praline Pie","isFavorite":false,"linkUrl":"/recipes/apple-pear-praline-pie/09c14b7a-b4ce-4d89-a985-0f3253f1cbde","numberOfRatings":"0","averageRating":"0","averageRatingStars":"0","smallImageUrl":"https://rms-media-prod.generalmills.com/e10a7759-feed-4b04-a8e0-0d5828fb6d2f.jpg","mediumImageUrl":"https://rms-media-prod.generalmills.com/29d5eadd-3b4c-4da2-9083-c57b3ff9308c.jpg"},{"contentId":"8579fffa-342c-4032-af90-a79ba418e37d","contentType":"Recipe","title":"Roasted Almond-Cranberry-Pear Crisp","isFavorite":false,"linkUrl":"/recipes/roasted-almond-cranberry-pear-crisp/8579fffa-342c-4032-af90-a79ba418e37d","numberOfRatings":"0","averageRating":"0","averageRatingStars":"0","smallImageUrl":"https://rms-media-prod.generalmills.com/7bf66f89-2cc0-4401-893a-0912a692c34c.jpg","mediumImageUrl":"https://rms-media-prod.generalmills.com/7bf66f89-2cc0-4401-893a-0912a692c34c.jpg"},{"contentId":"f826deba-63f1-4785-96ba-053d63fcf836","contentType":"Recipe","title":"Apple Cranberry Crumble","isFavorite":false,"linkUrl":"/recipes/apple-cranberry-crumble/f826deba-63f1-4785-96ba-053d63fcf836","numberOfRatings":"0","averageRating":"0","averageRatingStars":"0","smallImageUrl":"https://rms-media-prod.generalmills.com/004e1f13-f176-408f-b485-0f0340796249.jpg","mediumImageUrl":"https://rms-media-prod.generalmills.com/ec956c3c-21e3-4c5f-bd9f-5523c35ccf49.jpg"},{"contentId":"125874f5-4abb-472f-8aac-aa439418b7d7","contentType":"Recipe","title":"Apple Pear Cream Cheese Drop Danish","isFavorite":false,"linkUrl":"/recipes/apple-pear-cream-cheese-drop-danish/125874f5-4abb-472f-8aac-aa439418b7d7","numberOfRatings":"0","averageRating":"0","averageRatingStars":"0","smallImageUrl":"https://rms-media-prod.generalmills.com/cd8dc1de-8d25-4b2c-8de8-b79f3f5cf7fa.jpg","mediumImageUrl":"https://rms-media-prod.generalmills.com/8655a0cd-f1f3-4cf3-8f41-c83f5cadb3c4.jpg"}],"availableItems":[{"contentId":"9075a408-5140-491d-9db2-f3a1c8ae3170","contentType":"Recipe","title":"Pear and Cranberry Pie","isFavorite":false,"linkUrl":"/recipes/pear-and-cranberry-pie/9075a408-5140-491d-9db2-f3a1c8ae3170","numberOfRatings":"0","averageRating":"0","averageRatingStars":"0","smallImageUrl":"https://rms-media-prod.generalmills.com/756c2c41-fcd2-4d0b-ba57-a2d7aefbadc3.jpg","mediumImageUrl":"https://rms-media-prod.generalmills.com/3d9fa860-f257-4be1-89d0-bb8bf1e385f3.jpg"},{"contentId":"51fa1399-115d-42ac-93a1-c539dd6ef74f","contentType":"Recipe","title":"Streusel-Topped Cranberry-Pear Tart","isFavorite":false,"linkUrl":"/recipes/streusel-topped-cranberry-pear-tart/51fa1399-115d-42ac-93a1-c539dd6ef74f","numberOfRatings":"0","averageRating":"0","averageRatingStars":"0","smallImageUrl":"https://rms-media-prod.generalmills.com/48bb2eeb-d164-45bf-97ed-9d0068e10d35.jpg","mediumImageUrl":"https://rms-media-prod.generalmills.com/11ef8e70-584e-4e9b-a238-e83176164329.jpg"},{"contentId":"09c14b7a-b4ce-4d89-a985-0f3253f1cbde","contentType":"Recipe","title":"Apple-Pear Praline Pie","isFavorite":false,"linkUrl":"/recipes/apple-pear-praline-pie/09c14b7a-b4ce-4d89-a985-0f3253f1cbde","numberOfRatings":"0","averageRating":"0","averageRatingStars":"0","smallImageUrl":"https://rms-media-prod.generalmills.com/e10a7759-feed-4b04-a8e0-0d5828fb6d2f.jpg","mediumImageUrl":"https://rms-media-prod.generalmills.com/29d5eadd-3b4c-4da2-9083-c57b3ff9308c.jpg"},{"contentId":"8579fffa-342c-4032-af90-a79ba418e37d","contentType":"Recipe","title":"Roasted Almond-Cranberry-Pear Crisp","isFavorite":false,"linkUrl":"/recipes/roasted-almond-cranberry-pear-crisp/8579fffa-342c-4032-af90-a79ba418e37d","numberOfRatings":"0","averageRating":"0","averageRatingStars":"0","smallImageUrl":"https://rms-media-prod.generalmills.com/7bf66f89-2cc0-4401-893a-0912a692c34c.jpg","mediumImageUrl":"https://rms-media-prod.generalmills.com/7bf66f89-2cc0-4401-893a-0912a692c34c.jpg"},{"contentId":"f826deba-63f1-4785-96ba-053d63fcf836","contentType":"Recipe","title":"Apple Cranberry Crumble","isFavorite":false,"linkUrl":"/recipes/apple-cranberry-crumble/f826deba-63f1-4785-96ba-053d63fcf836","numberOfRatings":"0","averageRating":"0","averageRatingStars":"0","smallImageUrl":"https://rms-media-prod.generalmills.com/004e1f13-f176-408f-b485-0f0340796249.jpg","mediumImageUrl":"https://rms-media-prod.generalmills.com/ec956c3c-21e3-4c5f-bd9f-5523c35ccf49.jpg"},{"contentId":"125874f5-4abb-472f-8aac-aa439418b7d7","contentType":"Recipe","title":"Apple Pear Cream Cheese Drop Danish","isFavorite":false,"linkUrl":"/recipes/apple-pear-cream-cheese-drop-danish/125874f5-4abb-472f-8aac-aa439418b7d7","numberOfRatings":"0","averageRating":"0","averageRatingStars":"0","smallImageUrl":"https://rms-media-prod.generalmills.com/cd8dc1de-8d25-4b2c-8de8-b79f3f5cf7fa.jpg","mediumImageUrl":"https://rms-media-prod.generalmills.com/8655a0cd-f1f3-4cf3-8f41-c83f5cadb3c4.jpg"}]}};
var moduleName = 'relatedContent';
var isVueModule = true;
GeneralMills.PandoSites.RegisterControlInstance(moduleName, configuration, componentMetadata, isVueModule)
});
})();
(function() {
document.addEventListener('DOMContentLoaded', function() {
var componentMetadata = JSON.parse('\x7b\x22componentName\x22\x3a\x22DoubleClick_fc1638cc-1e2b-4009-91c0-4b3128b002dd\x22,\x22deferOptions\x22\x3a\x7b\x22deferComponent\x22\x3atrue,\x22deferType\x22\x3a\x22OnDemand\x22,\x22deferId\x22\x3a\x22reb914ce910ee41bc9152c899a90ebd17\x22,\x22deferredContainerId\x22\x3a\x22\x2fmain\x2frdpSecondaryAd\x22,\x22deferredContainerView\x22\x3a\x22DoubleClick\x22\x7d,\x22viewName\x22\x3a\x22DoubleClick\x22\x7d');
var configuration = {"adId":"lmd/recipes_300x250_bottom","minPageWidth":"1000","maxPageWidth":"9999","defaultMinPageWidth":"1000","defaultMaxPageWidth":"9999","size":"[[300,250], [300,600]]","refreshWhenViewed":false,"adContainerId":"9a1df4e3-409b-4d9d-976c-dd3f6317a94d","doubleClickAdContainerId":"9f13525a-5eb8-4370-a70e-19f10dbc5154","adCaptionText":"Advertisement","networkCode":"/21727793496/","relevantMetadata":[],"privacyOptOut":true,"isThirdPartyProvider":false,"thirdPartyTag":"","sovrnCssClass":"","responsive":false,"contentType":"Recipe","itemId":"8b3daad2-44b5-4032-a9ec-15f7790e6330","continuesBelowText":"Recipe Continues Below"};
var moduleName = 'doubleClick';
var isVueModule = true;
GeneralMills.PandoSites.RegisterControlInstance(moduleName, configuration, componentMetadata, isVueModule)
});
})();
(function() {
document.addEventListener('DOMContentLoaded', function() {
var componentMetadata = JSON.parse('\x7b\x22componentName\x22\x3a\x22DoubleClick_ff3502ca-24ae-487a-a7ad-92fe03fbaffd\x22,\x22deferOptions\x22\x3a\x7b\x22deferComponent\x22\x3atrue,\x22deferType\x22\x3a\x22OnDemand\x22,\x22deferId\x22\x3a\x22rfe4e203f9e9042908cb4b2d5a742b8b7\x22,\x22deferredContainerId\x22\x3a\x22\x2fmain\x2frdpSecondaryAd\x22,\x22deferredContainerView\x22\x3a\x22DoubleClick\x22\x7d,\x22viewName\x22\x3a\x22DoubleClick\x22\x7d');
var configuration = {"adId":"lmd/recipes_728x90_bottom","minPageWidth":"768","maxPageWidth":"999","defaultMinPageWidth":"1000","defaultMaxPageWidth":"9999","size":"[[728, 90], [970, 90]]","refreshWhenViewed":false,"adContainerId":"0e00c964-e650-477c-b417-dc12ea8dd2a1","doubleClickAdContainerId":"35b64618-2ff2-46bc-a01f-17df7aba077b","adCaptionText":"Advertisement","networkCode":"/21727793496/","relevantMetadata":[],"privacyOptOut":true,"isThirdPartyProvider":false,"thirdPartyTag":"","sovrnCssClass":"","responsive":false,"contentType":"Recipe","itemId":"8b3daad2-44b5-4032-a9ec-15f7790e6330","continuesBelowText":"Recipe Continues Below"};
var moduleName = 'doubleClick';
var isVueModule = true;
GeneralMills.PandoSites.RegisterControlInstance(moduleName, configuration, componentMetadata, isVueModule)
});
})();
(function() {
document.addEventListener('DOMContentLoaded', function() {
var componentMetadata = JSON.parse('\x7b\x22componentName\x22\x3a\x22DoubleClick_947ab954-6a69-4303-8713-83bad2e339e2\x22,\x22deferOptions\x22\x3a\x7b\x22deferComponent\x22\x3atrue,\x22deferType\x22\x3a\x22OnDemand\x22,\x22deferId\x22\x3a\x22r3be545718b5e4cb5932a0596f0343285\x22,\x22deferredContainerId\x22\x3a\x22\x2fmain\x2frdpSecondaryAd\x22,\x22deferredContainerView\x22\x3a\x22DoubleClick\x22\x7d,\x22viewName\x22\x3a\x22DoubleClick\x22\x7d');
var configuration = {"adId":"m_lmd/recipes_300x250_bottom","minPageWidth":"299","maxPageWidth":"767","defaultMinPageWidth":"1000","defaultMaxPageWidth":"9999","size":"[[300,250], [300,600]]","refreshWhenViewed":false,"adContainerId":"3da641ba-3f3c-414e-ae49-5d1b1c999c25","doubleClickAdContainerId":"cc20970b-b7a8-4fa5-bce7-fb4391aeb3bf","adCaptionText":"Advertisement","networkCode":"/21727793496/","relevantMetadata":[],"privacyOptOut":true,"isThirdPartyProvider":false,"thirdPartyTag":"","sovrnCssClass":"","responsive":false,"contentType":"Recipe","itemId":"8b3daad2-44b5-4032-a9ec-15f7790e6330","continuesBelowText":"Recipe Continues Below"};
var moduleName = 'doubleClick';
var isVueModule = true;
GeneralMills.PandoSites.RegisterControlInstance(moduleName, configuration, componentMetadata, isVueModule)
});
})();
(function() {
document.addEventListener('DOMContentLoaded', function() {
var componentMetadata = JSON.parse('\x7b\x22componentName\x22\x3a\x22NewsletterCTA_ec03e9a8-76e8-46ba-af4e-f8f0f854889f\x22,\x22deferOptions\x22\x3a\x7b\x22deferComponent\x22\x3atrue,\x22deferType\x22\x3a\x22OnDemand\x22,\x22deferId\x22\x3a\x22r17e86478618c4834a7ff213d49e3b4dd\x22,\x22deferredContainerId\x22\x3a\x22\x2fmain\x2frdpInlineSubscriber\x22,\x22deferredContainerView\x22\x3a\x22RecipeDetail\x22\x7d,\x22viewName\x22\x3a\x22NewsletterCTA\x22\x7d');
var configuration = {"unsubscribedNewsletters":[{"listId":"0caa9ec7-a957-48fb-8a20-8a7c557ba9b8","thumbnailImageUrl":"/-/media/GMI/Core-Sites/LMD/Images/Newsletters/LMDLogo.jpg","previewUrl":"https://www.lifemadedelicious.ca/PreviewNewsletter","name":"LMD Newsletter","isPromo":false}],"settings":{"anonymousCopy":"Sign up for our newsletter","anonymousDescriptionCopy":"\u003cspan style=\u0022color: black;\u0022\u003eI accept the General Mills \u003ca rel=\u0022noopener noreferrer\u0022 href=\u0022https://www.generalmills.com/privacy-security/us-english-privacy-policy\u0022 target=\u0022_blank\u0022 title=\u0022https://www.generalmills.com/privacy-security/us-english-privacy-policy\u0022\u003ePrivacy Policy\u003c/a\u003e\u0026nbsp;and agree that my information may be used across the General Mills \u003ca rel=\u0022noopener noreferrer\u0022 href=\u0022https://www.generalmills.com/food-we-make/brands\u0022 target=\u0022_blank\u0022 title=\u0022https://www.generalmills.com/food-we-make/brands\u0022\u003efamily of brands.\u003c/a\u003e\u003c/span\u003e","anonymousThankYouCopy":"Thanks! Your First Email is on its Way","anonymousThankYouDescriptionCopy":"Now that you\u0027re on our email list, become a full member of LifeMadeDelicious.ca! Members can save their favorite recipes, print coupons and more.","anonymousButtonText":"Sign Up","anonymousEmailInvalidErrorText":"Please enter a valid email address.","anonymousSubscribeErrorText":"We encountered an error while signing you up. Please try again.","anonymousEmailAddressPlaceholderText":"Enter your email address.","anonymousEmailAddressLabel":"","anonymousLegalCopy":"","requiredFieldText":"","standardSmallImageUrl":"/-/media/GMI/Core-Sites/LMD/Images/Shared/MyAccount/global-footer-2022.jpg","standardLargeImageUrl":"/-/media/GMI/Core-Sites/LMD/Images/Shared/MyAccount/global-footer-2022.jpg","backgroundColor":"","accentColor":"","registrationUrl":"/user-profile/register?RegAction=SUBSCRIBERUPGRADE\u0026esrc=17262\u0026returnUrl=%2frecipes%2fapple-pear-and-cranberry-pie%2f8b3daad2-44b5-4032-a9ec-15f7790e6330","registrationLinkText":"Join Free","enableExpandedFields":false,"hideForSessionCookieExpiration":0,"ctaType":"StandardAnonymous","location":"Rail","userState":"Anonymous","sourceCodeOverride":0}};
var moduleName = 'newsletterCta';
var isVueModule = true;
GeneralMills.PandoSites.RegisterControlInstance(moduleName, configuration, componentMetadata, isVueModule)
});
})();
(function() {
document.addEventListener('DOMContentLoaded', function() {
var componentMetadata = JSON.parse('\x7b\x22componentName\x22\x3a\x22DoubleClick_895f07c7-f4d9-4222-b3d3-81fc2a216e65\x22,\x22deferOptions\x22\x3a\x7b\x22deferComponent\x22\x3atrue,\x22deferType\x22\x3a\x22OnDemand\x22,\x22deferId\x22\x3a\x22rab0138d019e14fd6b0a441673bf1c695\x22,\x22deferredContainerId\x22\x3a\x22\x2fmain\x2frdpTernaryAd\x22,\x22deferredContainerView\x22\x3a\x22DoubleClick\x22\x7d,\x22viewName\x22\x3a\x22DoubleClick\x22\x7d');
var configuration = {"adId":"lmd/recipe_300x250_bottom2","minPageWidth":"1000","maxPageWidth":"9999","defaultMinPageWidth":"1000","defaultMaxPageWidth":"9999","size":"[[300,250], [300,600]]","refreshWhenViewed":false,"adContainerId":"74b2acbc-9586-4e63-b850-41756c55e12a","doubleClickAdContainerId":"63f1b8b1-d049-46b9-b071-ddc290425fb0","adCaptionText":"Advertisement","networkCode":"/21727793496/","relevantMetadata":[],"privacyOptOut":true,"isThirdPartyProvider":false,"thirdPartyTag":"","sovrnCssClass":"","responsive":false,"contentType":"Recipe","itemId":"8b3daad2-44b5-4032-a9ec-15f7790e6330","continuesBelowText":"Recipe Continues Below"};
var moduleName = 'doubleClick';
var isVueModule = true;
GeneralMills.PandoSites.RegisterControlInstance(moduleName, configuration, componentMetadata, isVueModule)
});
})();